As mentioned in my older blog entries, IQ of the Spanish demo group RGBA is one of my CG heroes. I know hardly any people who can combine mathematical understanding and arts in a more beautiful way. This prod here is quite old, but I just knew the still-image (a 4K executable). Here is also an animation where you can see procedural graphics at the highest level in a beautiful fly-over.
http://www.youtube.com/watch?v=XAWPCmVC5jA
Monday, May 23, 2011
Tuesday, May 17, 2011
1. Idea and Motivation for today's blog entry
Recently I started playing with ICE in Softimage, which is a wonderfull node based tool for creating your own deformers, particle simulations and much more. The workflow reminds me a lot of mental mill (and I have always been a huge fan of node based editing systems) so it was not hard to get some results pretty soon.
As I was playing around, I couldn't help thinking about creating a shader in mental mill that implements a neat effect that takes advantage of ICE in Softimage. This tutorial won't be about ICE, though I will roughly explain a few details and I intend to post the project that I created along with the modified shader.
You can find the data to complete this tutorial here
In the zip file you can find the mental mill project as well as the softimage project. Read "Readme.txt" for a more detailed description
1.1 Preparation:
First you need to create folders and set up default paths so that you won't end up with absolute path names in your work. This will save you lots of time later on. Absolute path names are the root of all evil as soon as you start moving your files between multiple machines...
2. Implementation Softimage
Let's start in Softimage where I implemented an effect that attracts geometry to other geometry. So how does it work?
I got a piece of geometry that I want to deform and another geometry that I will refer to as "attractor" since it will attract the other geometry as it is moved closer to the target geometry that has the ice effect applied.
2.1 ICE Deformer
In my ICE tree I search for the nearest points on the attractor and I calculate the average value, so that I know to which position the point is attracted to.
The distance of the source point to the averaged target position is calculated. I was implementing a falloff using the square distance, which can be expressed as 1/(distance^2).
The shorter the distance, the more the point will be attracted as the result of that calculation gets bigger. I made sure that the result of that calculation does not exceed the range between 0 and 1 by using a clamp node. This allowed me to calculate the final position by lerping between the original position value and the averaged value that I calculated on the attractor.
2.2 ICE weight map
The next "challenge" if you like to say so was to write the values that had been calculated into a Colors at vertices map. The data from that map can then be sent over to the shader.
So first I created a Colors at Vertices Property (Model > Property > Color At Vertices Map) into which I wanted to write the data calculated by the
However, it is not possible to set data that needs to be processed 'per sample' from an output that was calculated per point.
To circumvent that problem I took a look around and I found the explanation in the XSIBase forum that I still visit regularly. The answer is to write the data in some temporary variables using the Set Data node.
Then, when writing into the Vertex Color map (which is sample based) the data can be retrieved using Get -> self.nodelocation and retrieving the data that we set which is then written into the Vertex Color.

Now when switching to constant display, you can see the 'weight' as a grayscale being interpolated between the vertices. So much for the work that needs to be done in XSI. Next we will take a closer look at the actual shader that we will create in mental mill.
3. mental mill shader implementation
The goal of this tutorial is to get an understanding of how to use Softimage ICE and shaders that were built in mental mill. For the sake of simplicity I reduce the size of the mental mill project to use just as few nodes as necessary.
The idea for the effect is that the original transforms (or simply blends) into another surface as the attractor moves closer and closer. This transition effect is controlled by the grayscale map that we generated in our ICE tree above.
3.1 The mental mill network for the Phenomenon "Break_D_Ice"
We want to blend between two materials. In order to give that impression, we will mix two bump maps as well as two diffuse texture maps and feed them into an illumination node. I used an Illumination_phong node (D) here.
3.2 Working around the Color At Vertices map in mental mill
Right now we just got one problem to solve: Mental mill does not know about any Color At Vertices Map, so we need to create a stand-in shader node. (We will replace it manually after we have exported the shader and loaded in in Softimage). For the stand-in I created a texture_lookup_2d node (G). I loaded a texture with spherical transition from white to black which allows me to preview the transitions in mental mill.
3.3 It's a matter of blend: Mixing textures
I used the result of the stand-in texture lookup node to blend the diffuse map textures (A) and (H). Note that I am multiplying (B) the two diffuse textures (A) and (H) before mixing, so the asphalt texture is modulated with the cracks.
Then the textures are mixed (C) and fed into the Illumination Phong node for both diffuse and specular texture. The result of the Illumination Phong node is fed to the result output of the Phenomenon.
Note: Typically you would have separate textures for the specular color, I just try to keep the example small...
The same kind of blending is done with the normal maps. mental mill 1.1 ships with a couple of utility Phenomena so that you don't need to create the most basic utilities on your own. I used the Dual bump mixer here (E). Again, the bump mix is controlled by the stand-in texture lookup node. Since the 'Bump Mix' parameter of the Dual Bump Mixer takes a float value, it's converted from a color to a float.
3.4 The interface parameters to control the effect
It's always a good practice to reduce the amount of interface parameters to a minimum. This has several reasons:
The less parameters you have, the easier it is to tweak the shader.
Parameters that are not exposed can be made constants by the shader compiler which can reduce instruction count of the shader.
You can see in the screenshots which parameters I chose to expose. Feel free to expose the parameters that you consider relevant.
3.5 Exporting the shader for Softimage
Finally, select your Phenomenon that you created and export it for Softimage under "File > Export..." and then select Autodesk Softimage (CgFX) from the dropdown menu. The location where you save the file is important. In newer Softimage versions (I used 2010) you need to store the shader files in a dedicated directory from which they will be loaded automatically upon startup. C:\users\username\Autodesk\Softimage_2010\Application\CgFX. (I had to create the CgFX folder manually, it was not present.)
Give the shader a meaningful name, I chose to name it Ice_breaker which will be then stored as Ice_breaker.cgfx.
4. Loading the shader in Softimage
Next we will load the shader in Softimage. The realtime shader framework has changed in the recent version of Softimage. In older versions of Softimage you were able to load shaders using dedicated HLSL and CgFX nodes.
In the new version all you need is to store the shader in a dedicated directory from whichthe shader will be loaded.
4.1 loading the shader

The next step is about hand-massaging the shadercode, so that we can feed the Color At Vertices Map that our ICE tree is generating to the exported mental mill shader. For that we need to edit the shader a little bit. To edit a shader in Softimage, right click the shader instance in the Render Tree or in the shader list and choose "Edit Shader" from the context menu. This will open the shader code editor.
4.2.1 Understanding Realtime Shaders: A quick overview
For the next step, you need to understand the structure of an exported MetaSL shader, so I will give a rough outline how realtime shaders work:
A realtime shader takes a number of data that can be defined either per vertex or globally per frame. Per vertex data is fed to the shader via a vertex stream. The per-vertex data is first passed to the vertex shader which may transform the data (transforming the vertex positions by viewing matrices, etc...). Other data might be passed through to the fragment shader without modifying it, for example UV coordinates.
In your shader code that mental mill is exporting for you, you don't have to worry about these things: mental mill takes care to set up all necessary vertex stream variables. Once the vertex streams are set up correctly, the right data that you want to process is automatically passed to the shader. Examples for per vertex data are:
Softimage has a convenient interface that lets you assign any vertex data from Softimage to the vertex stream variables of a shader.
This is what we need to do to get this working:
When a mental mill shader is exported, all shader nodes are converted to functions in the exported shader code that will be called in the correct order to carry out all necessary tasks. In step 3.2 we created a stand-in texture lookup node that was acting as a holdout for our Color At Vertices map.
4.2.2 Editing the mental mill shader to use texture space slot for passthrough
As we just said: We want to use a texture space to pass the Color At Vertices information from Softimage to the shader. Lets take a look at the vertex shader that you exported from mental mill:
You can see, that the Vert2Frag structure holds an array of 4 vertex streams (in the image below on the left, colored in orange).
In the vertex shader this stream array is passed to the state-structure variable state.tex_coord, colored in green. We need to remember where this stream data is stored. The first array element stream will hold the texture coordinates that we will be using for the texture lookups. The second one will hold the Color at Vertices Data.

Now we need to find the Texture lookup and replace it with the variable that holds the result of the texture lookup with the vertex stream value.

In the Shader Code editor of Softimage click "Validate" to check your shader for errors. The shader should validate and you are ready to Apply it.
If you set up everything correctly, make sure that your viewport is set to "OpenGL" preview. Below you can see some examples. I tried to vary the effect a little bit more. you can make your mental mill example much more sophisticated by extending this example. So feel free to do so!

5 Conclusion
In this tutorial you learned some techniques that allow you to customize and hand tweak your shader code. It's important to understand that by knowing a little bit of Cg (or HLSL) you can start customizing your shader code so that it fits on top of almost any engine.
Also remember the way that data is passed to a shader. You saw, that in Softimage you can assign almost any data to a vertex stream. Knowing that, this allows you to add certain features by hand if you are familiar with your favorite DCC tool and CgFx/HLSL.
Here you can see a video clip how to export the shader from mental mill and load it in Softimage:
Further reading:
The CG Tutorial
This book that is available online gives you a better idea of how the CG language works and you can learn more about the structure of a cg shader.
 |
| Preview of the CgFX shader in Softimage |
As I was playing around, I couldn't help thinking about creating a shader in mental mill that implements a neat effect that takes advantage of ICE in Softimage. This tutorial won't be about ICE, though I will roughly explain a few details and I intend to post the project that I created along with the modified shader.
You can find the data to complete this tutorial here
In the zip file you can find the mental mill project as well as the softimage project. Read "Readme.txt" for a more detailed description
1.1 Preparation:
First you need to create folders and set up default paths so that you won't end up with absolute path names in your work. This will save you lots of time later on. Absolute path names are the root of all evil as soon as you start moving your files between multiple machines...
- Under C:\users\username\Autodesk\Softimage_2010\Application\ create a folder called "CgFX" and another folder called "fxtextures". These will be needed for storing your exported shader and your textures.
- Copy the textures that you will be using in this tuorial under C:\users\username\Autodesk\Softimage_2010\Application\fxtexturesso that Softimage will be able to load them automatically
- Make sure that the texture path is added to mental mill's texture paths. To add a mental mill texture path, go to "Edit > Preferences > Path". Under Texture click Edit and add the path to your textures. This has the effect, that mental mill won't store absolute file paths when you select a texture from that directory.
 |
| Adding a texture path in mental mill |
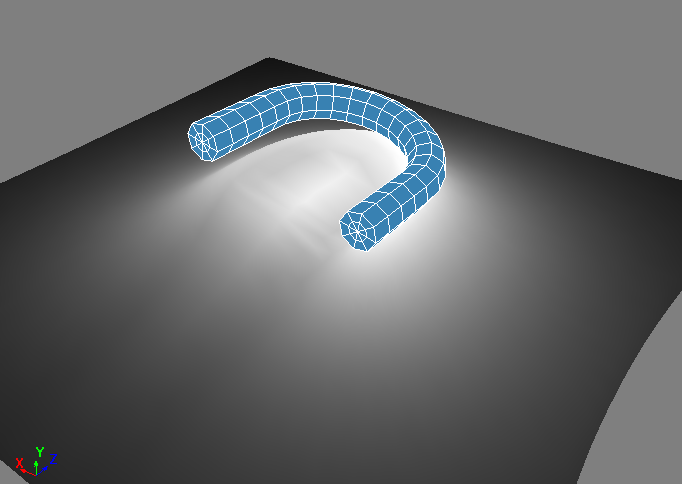
2. Implementation Softimage
Let's start in Softimage where I implemented an effect that attracts geometry to other geometry. So how does it work?
 |
| The "magnetic skin" effect in Softimage |
2.1 ICE Deformer
In my ICE tree I search for the nearest points on the attractor and I calculate the average value, so that I know to which position the point is attracted to.
 |
| B is calculated as average position of the 'N' nearest points to point A. As the distance between A and B gets smaller, A will be 'warped' more and more towards B |
The distance of the source point to the averaged target position is calculated. I was implementing a falloff using the square distance, which can be expressed as 1/(distance^2).
The shorter the distance, the more the point will be attracted as the result of that calculation gets bigger. I made sure that the result of that calculation does not exceed the range between 0 and 1 by using a clamp node. This allowed me to calculate the final position by lerping between the original position value and the averaged value that I calculated on the attractor.
2.2 ICE weight map
The next "challenge" if you like to say so was to write the values that had been calculated into a Colors at vertices map. The data from that map can then be sent over to the shader.
So first I created a Colors at Vertices Property (Model > Property > Color At Vertices Map) into which I wanted to write the data calculated by the
However, it is not possible to set data that needs to be processed 'per sample' from an output that was calculated per point.
 |
| When manipulating point-based data, it can't be written into sample based maps. The workaround is to stor the data in a temprary set data node and writing it into the Color At Vertices map (see image below) |
To circumvent that problem I took a look around and I found the explanation in the XSIBase forum that I still visit regularly. The answer is to write the data in some temporary variables using the Set Data node.
Then, when writing into the Vertex Color map (which is sample based) the data can be retrieved using Get -> self.nodelocation and retrieving the data that we set which is then written into the Vertex Color.

Now when switching to constant display, you can see the 'weight' as a grayscale being interpolated between the vertices. So much for the work that needs to be done in XSI. Next we will take a closer look at the actual shader that we will create in mental mill.
 |
| Inspecting the Vertex Color Map in Softimage. The more the points are attracted, the brighter they appear in the map |
3. mental mill shader implementation
The goal of this tutorial is to get an understanding of how to use Softimage ICE and shaders that were built in mental mill. For the sake of simplicity I reduce the size of the mental mill project to use just as few nodes as necessary.
The idea for the effect is that the original transforms (or simply blends) into another surface as the attractor moves closer and closer. This transition effect is controlled by the grayscale map that we generated in our ICE tree above.
3.1 The mental mill network for the Phenomenon "Break_D_Ice"
We want to blend between two materials. In order to give that impression, we will mix two bump maps as well as two diffuse texture maps and feed them into an illumination node. I used an Illumination_phong node (D) here.
 |
| The mental mill shader network: Note, that I renamed the Texture lookup nodes for more clarity. |
3.2 Working around the Color At Vertices map in mental mill
Right now we just got one problem to solve: Mental mill does not know about any Color At Vertices Map, so we need to create a stand-in shader node. (We will replace it manually after we have exported the shader and loaded in in Softimage). For the stand-in I created a texture_lookup_2d node (G). I loaded a texture with spherical transition from white to black which allows me to preview the transitions in mental mill.
3.3 It's a matter of blend: Mixing textures
I used the result of the stand-in texture lookup node to blend the diffuse map textures (A) and (H). Note that I am multiplying (B) the two diffuse textures (A) and (H) before mixing, so the asphalt texture is modulated with the cracks.
Then the textures are mixed (C) and fed into the Illumination Phong node for both diffuse and specular texture. The result of the Illumination Phong node is fed to the result output of the Phenomenon.
Note: Typically you would have separate textures for the specular color, I just try to keep the example small...
The same kind of blending is done with the normal maps. mental mill 1.1 ships with a couple of utility Phenomena so that you don't need to create the most basic utilities on your own. I used the Dual bump mixer here (E). Again, the bump mix is controlled by the stand-in texture lookup node. Since the 'Bump Mix' parameter of the Dual Bump Mixer takes a float value, it's converted from a color to a float.
3.4 The interface parameters to control the effect
It's always a good practice to reduce the amount of interface parameters to a minimum. This has several reasons:
The less parameters you have, the easier it is to tweak the shader.
Parameters that are not exposed can be made constants by the shader compiler which can reduce instruction count of the shader.
 |
| Interface parameters of the Phenomenon |
You can see in the screenshots which parameters I chose to expose. Feel free to expose the parameters that you consider relevant.
3.5 Exporting the shader for Softimage
Finally, select your Phenomenon that you created and export it for Softimage under "File > Export..." and then select Autodesk Softimage (CgFX) from the dropdown menu. The location where you save the file is important. In newer Softimage versions (I used 2010) you need to store the shader files in a dedicated directory from which they will be loaded automatically upon startup. C:\users\username\Autodesk\Softimage_2010\Application\CgFX. (I had to create the CgFX folder manually, it was not present.)
Give the shader a meaningful name, I chose to name it Ice_breaker which will be then stored as Ice_breaker.cgfx.
There are other places that you can store your shader in. Check "Loading Existing Effects Files in the Preset Manager" of your Softimage Manual.
4. Loading the shader in Softimage
Next we will load the shader in Softimage. The realtime shader framework has changed in the recent version of Softimage. In older versions of Softimage you were able to load shaders using dedicated HLSL and CgFX nodes.
In the new version all you need is to store the shader in a dedicated directory from whichthe shader will be loaded.
4.1 loading the shader
(Re)Start Softimage and open the Render Tree. If you stored the shader in the right directory, you can find your shader under the Realtime > CgFX category in the Render Tree.
 |
| Realtime shaders in mental mill |
Just drag and drop the shader from there to workspace and it is ready to be used: The image clips are automatically created and connected to your shader. If you set up your texture paths correctly as described under "preparation", then the images will be found automatically and the shader will display correctly.

4.2 How to feed a Color At Vertices map to the shader
The next step is about hand-massaging the shadercode, so that we can feed the Color At Vertices Map that our ICE tree is generating to the exported mental mill shader. For that we need to edit the shader a little bit. To edit a shader in Softimage, right click the shader instance in the Render Tree or in the shader list and choose "Edit Shader" from the context menu. This will open the shader code editor.
4.2.1 Understanding Realtime Shaders: A quick overview
For the next step, you need to understand the structure of an exported MetaSL shader, so I will give a rough outline how realtime shaders work:
A realtime shader takes a number of data that can be defined either per vertex or globally per frame. Per vertex data is fed to the shader via a vertex stream. The per-vertex data is first passed to the vertex shader which may transform the data (transforming the vertex positions by viewing matrices, etc...). Other data might be passed through to the fragment shader without modifying it, for example UV coordinates.
In your shader code that mental mill is exporting for you, you don't have to worry about these things: mental mill takes care to set up all necessary vertex stream variables. Once the vertex streams are set up correctly, the right data that you want to process is automatically passed to the shader. Examples for per vertex data are:
- Texture coordinates
- Vertex Position
- Normal
Softimage has a convenient interface that lets you assign any vertex data from Softimage to the vertex stream variables of a shader.
 |
| Assigning data from Softimage to stream-variables of the CgFX Shader |
This is what we need to do to get this working:
- In the shader code we will locate the texture lookup function of the stand-in node that was simulating the Color At Vertices Map. The variable that holds the result of the texture lookup of the stand-in node will be overwritten with the value that comes from the vertex stream variable that we 'hijacked'. That way you obtain the real value from the vertex stream data that the Ice Tree in Softimage is computing.
When a mental mill shader is exported, all shader nodes are converted to functions in the exported shader code that will be called in the correct order to carry out all necessary tasks. In step 3.2 we created a stand-in texture lookup node that was acting as a holdout for our Color At Vertices map.
4.2.2 Editing the mental mill shader to use texture space slot for passthrough
As we just said: We want to use a texture space to pass the Color At Vertices information from Softimage to the shader. Lets take a look at the vertex shader that you exported from mental mill:
You can see, that the Vert2Frag structure holds an array of 4 vertex streams (in the image below on the left, colored in orange).
In the vertex shader this stream array is passed to the state-structure variable state.tex_coord, colored in green. We need to remember where this stream data is stored. The first array element stream will hold the texture coordinates that we will be using for the texture lookups. The second one will hold the Color at Vertices Data.
Now we need to find the Texture lookup and replace it with the variable that holds the result of the texture lookup with the vertex stream value.
- Look for the main-function of the phenomenon that you exported from mental mill. In my case, the Phenomenon was called "Break_D_ice", so the function is called "Break_D_ice_main".
- Comment out the texture lookup function.
- When "float4 msl_Weightmap_result" is declared, assign it the texture stream variable:
float4 msl_Weightmap_result = float4(state.tex_coord[1].xyz, 1);

In the Shader Code editor of Softimage click "Validate" to check your shader for errors. The shader should validate and you are ready to Apply it.
If you set up everything correctly, make sure that your viewport is set to "OpenGL" preview. Below you can see some examples. I tried to vary the effect a little bit more. you can make your mental mill example much more sophisticated by extending this example. So feel free to do so!

5 Conclusion
In this tutorial you learned some techniques that allow you to customize and hand tweak your shader code. It's important to understand that by knowing a little bit of Cg (or HLSL) you can start customizing your shader code so that it fits on top of almost any engine.
Also remember the way that data is passed to a shader. You saw, that in Softimage you can assign almost any data to a vertex stream. Knowing that, this allows you to add certain features by hand if you are familiar with your favorite DCC tool and CgFx/HLSL.
Here you can see a video clip how to export the shader from mental mill and load it in Softimage:
Further reading:
The CG Tutorial
This book that is available online gives you a better idea of how the CG language works and you can learn more about the structure of a cg shader.
Subscribe to:
Posts (Atom)